Creating training documents for web agency clients
These training materials can come in the form of a video, a live training session - or documents, which the agency can can charge for or include in the project price.
In this guide, we will show you how to create a branded template for a hypothetical web agency, how to create a training or onboarding document for a client, and how to share the document with your customer.
Defining a branded template
As you probably want your documents to have an professional appearance, the first step would be to create a branded template for your web agency. This template will be used for all future training documents for clients and ensures a consistent look and feel.
If you just want to get started quickly, you can also export your documents with an existing template preset and skip to "Creating the training document".
To create a template, head to the template editor to define the layout, add the agency's logo, and set the color scheme as well as details as fonts to be used for certain areas. From within the app, you can access the templates by the main menu button and selecting "Manage templates".
You can get started by selecting one of the existing presets and adjust it to your needs.
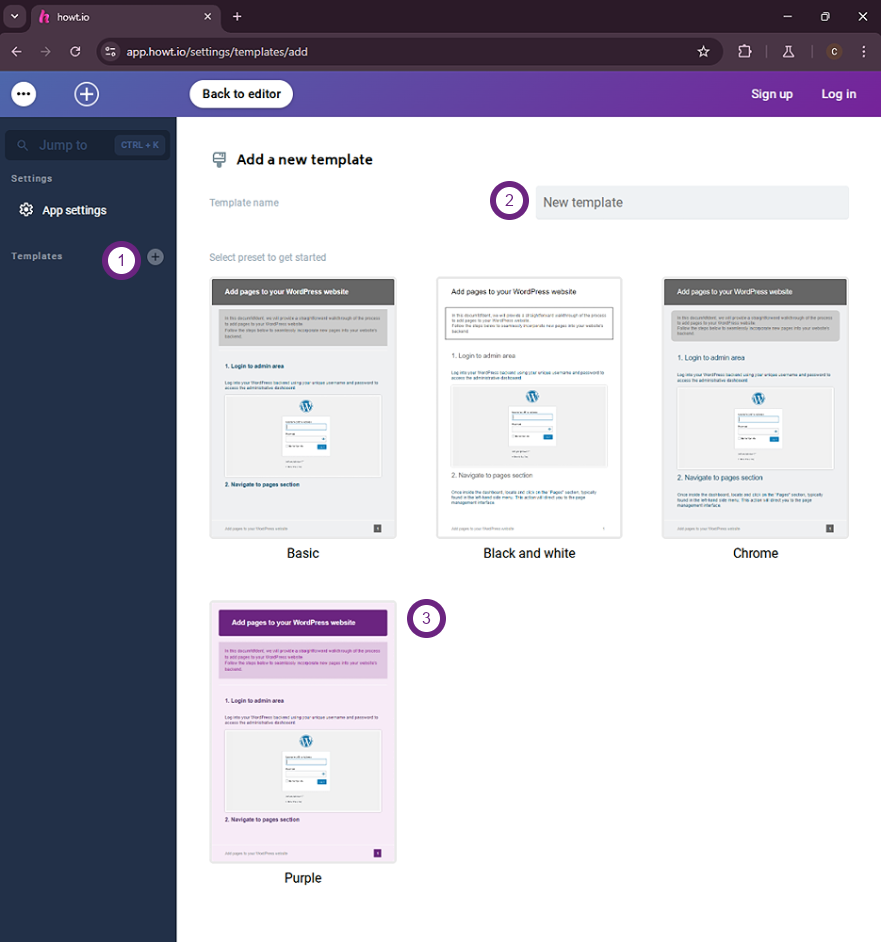
One you have selected your preset, the template editor will load on the "General" tab. Here you can define basic settings - like the unit to use throughout the template, the background color and the font details like type, style and color. You can also define margin presets here that can be used throughout the template to maintain consistency.
On each tab, you can define different styles for the template, like the header, the footer, the document description or the steps, aka the contents of the document. You could also add custom CSS for more granularity.
We will not go into all details regarding template creation here, you can visit the key-concepts and templates pages in the user manual to learn more.
Creating the training document
Starting a new document
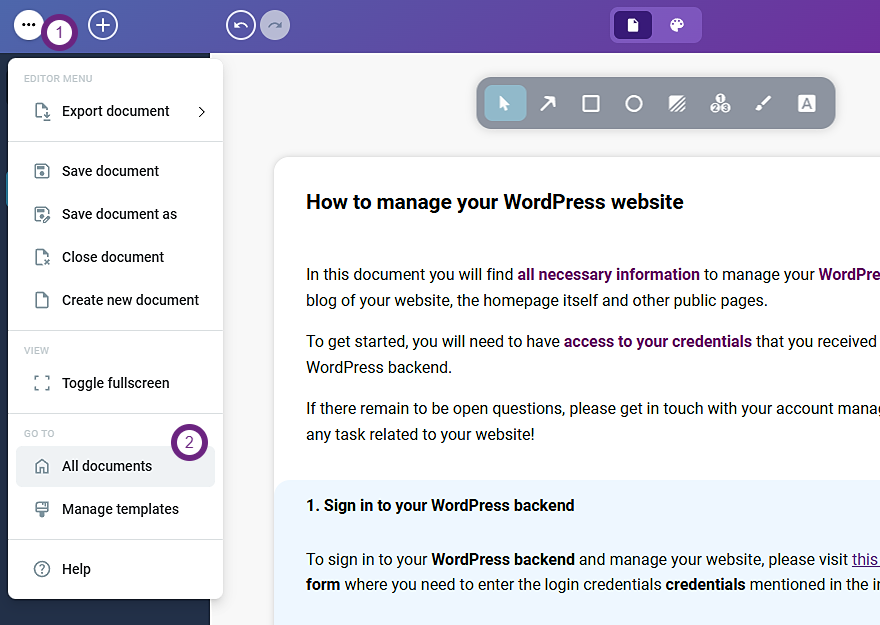
Once you have created a template (or are happy with one of the existing presets), you can reuse it for any documents that you create from there on. To get started with a new document, head to the document editor. If there's already an opened document, you can start with a fresh sheet by selecting the "Create new document" via the main menu button.
Setting the tone - title & document description
Within the howt.io app, documents usually are composed with the following structure:
- The document subject
- A global document description
- Steps with the document contents
For this guide, we will assume that we're creating a training document for a WordPress backend that we would hand to the client so they can distribute to team members and use as a reference for managing their website.
For the document subject, we click on the subject placeholder and enter "How to manage your WordPress website"
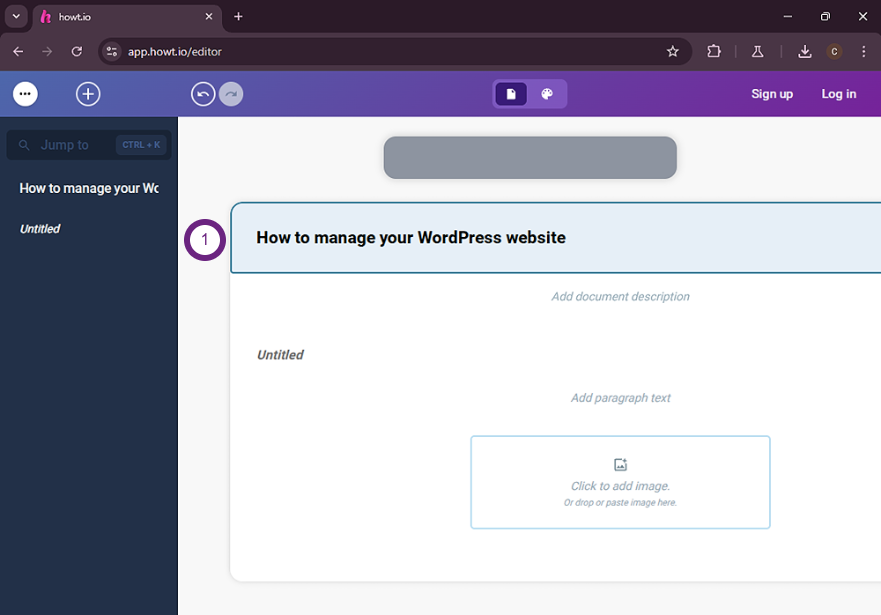
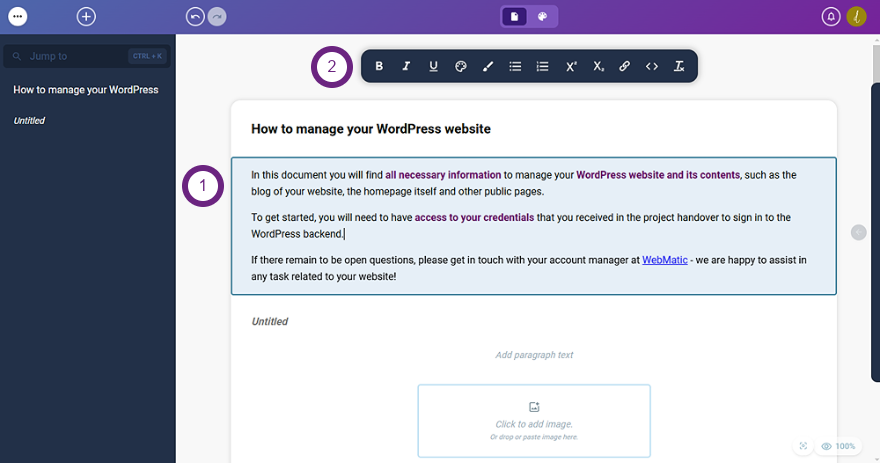
Next, we write a document description that would be displayed at the top of the document. This could be a short introduction to the document, explaining what the document is about and what the reader can expect to learn from it. For that we can use the rich-text editor to format the text to make it more appealing.
Adding a step to the document
Now we can start with the actual content of the document, the steps that the client should follow to manage their WordPress website. We can add a new step by clicking on the "Add step" button and entering the step title.
To make it more interactive and leave as little questions open as possible open, we will add screenshots to each step to show the client what they should see on their screen and what actions they should take.
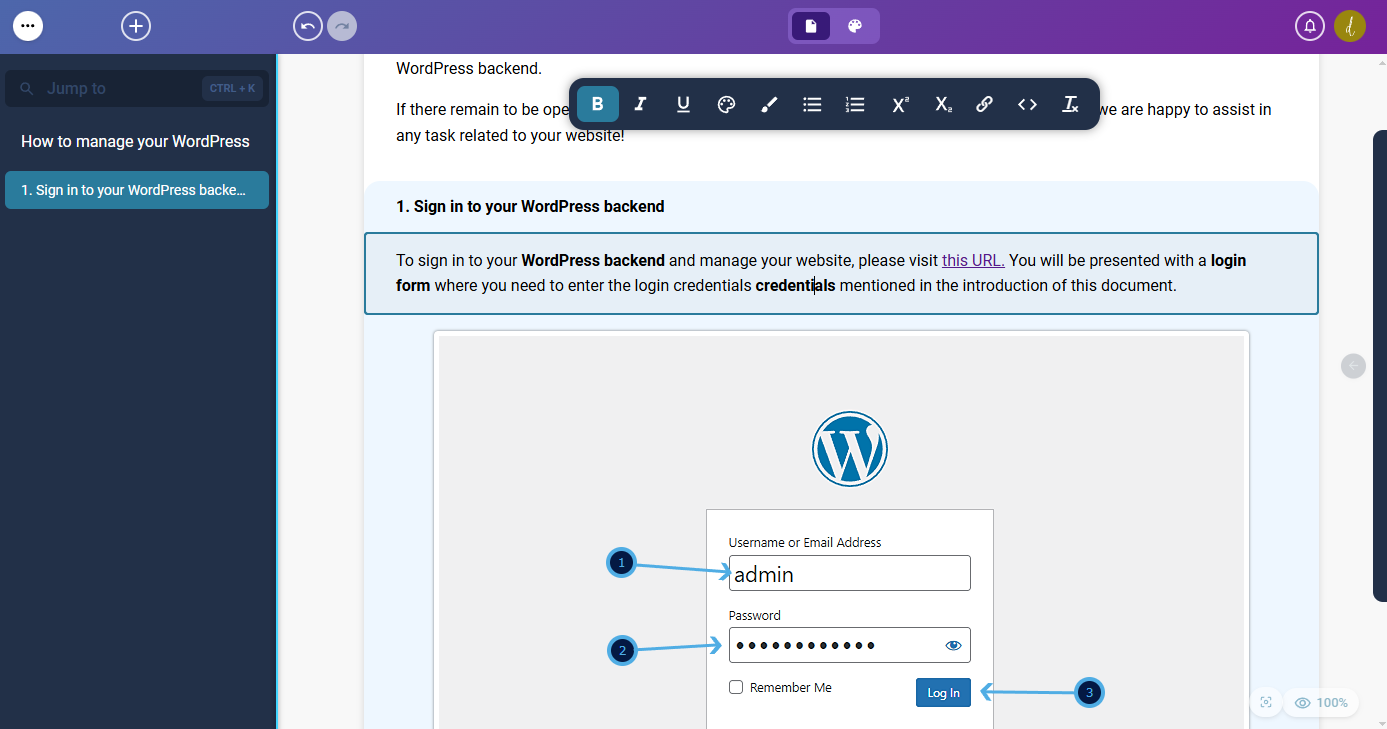
Step images
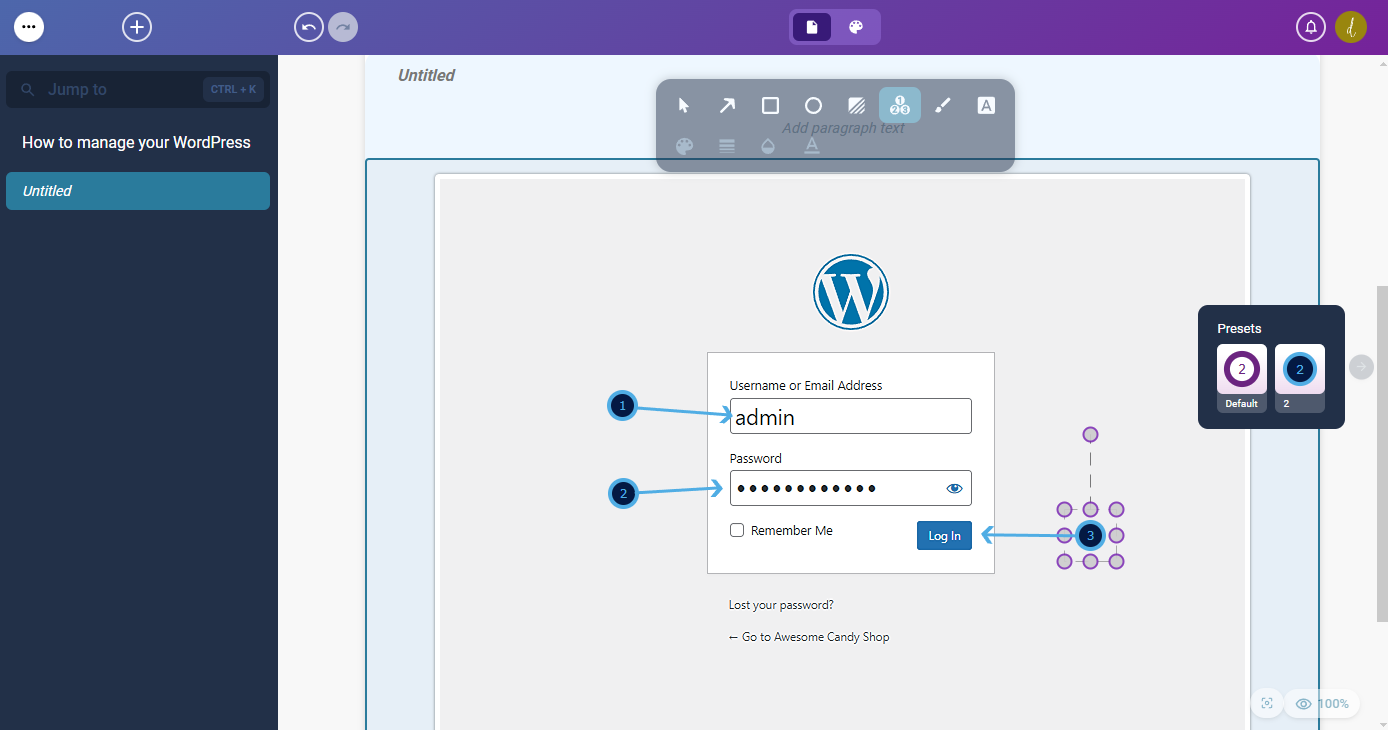
Each step contains a paragraph and an image step item by default. To add a screenshot for the first step, we head to the WordPress login page and make a screenshot of the login form. We can then add the screenshot to the document by clicking on the image placeholder and selecting the file from our computer - or by dragging and dropping the file into the placeholder - alternatively we can also paste the image from the clipboard while having the image step-item selected.
For images, we make use of the rich amount of annotations that we can add to the image to highlight certain areas or flows.
Step paragraphs
We want to explain what the client should do on the login page, so we use the existing paragraph step item and describe the steps that the client should take.
As we didn't do it previously, we will also add a title to the step.
Adding more steps to complete the training document
Now we can continue adding more steps to the document to cover all the necessary information. We can add as many steps and step items as needed - we can reorder them and the step themselves at any point so we are not strictly bound to a certain structure when quickly drafting a document.
Sharing the document with the client
Once we are happy with content of the document, we have 2 ways to apply the template on it and share it with the client: we can either export the document to a file format that we can send to the client via email or we can share the document directly with the client via a link.
Exporting the document
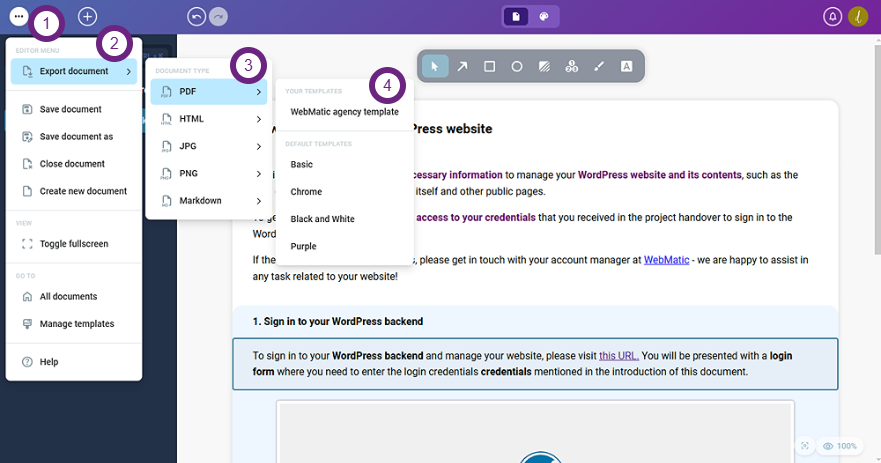
To export the document, we can click on the "Export document" button in the main menu and select the desired file format - and the template. As our client tend to be a non-technical audience, we would export it as a PDF file.
After that, the document will be generated and downloaded to your computer. You can then attach it to an email and send it to the client.
Sharing the document
To share the document with the client via a direct link, the document must be saved first. For that, you will need an account on howt.io. If you don't have one yet, you can sign up here.
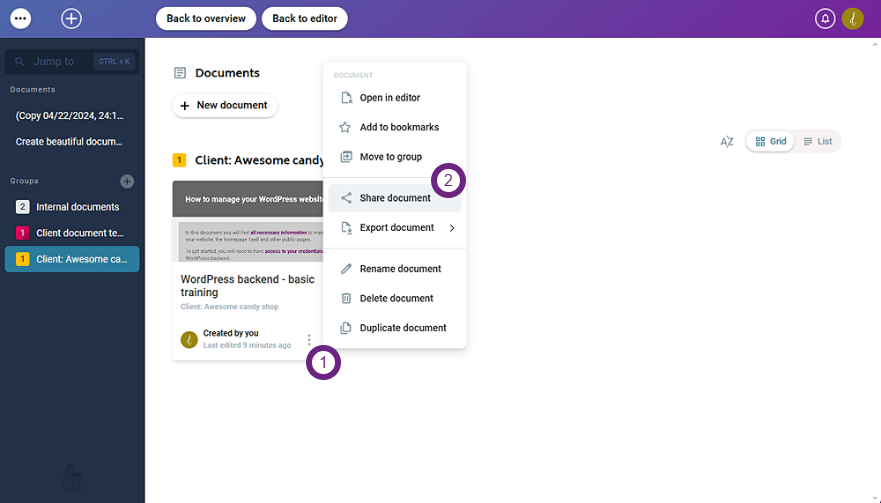
After we have saved the document (Main menu -> Save document / Save document as), we can go to the document overview^^
From there, we select the document options ("three dots" when hovering the document) and select "Share document" to open the sharing dialog.
In the sharing dialog, we can select the template to apply to the document, enable public access for the document and generate the sharing link.
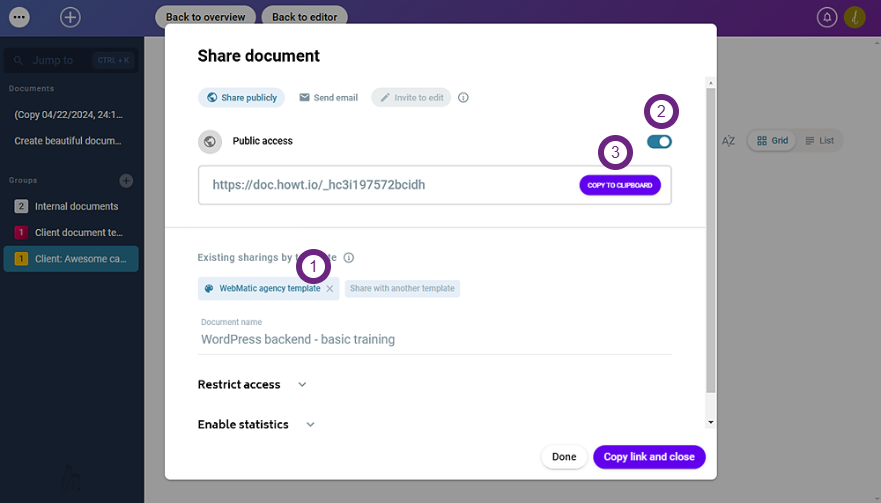
We can then copy the link and send it to the client via email or any other communication channel. We can also directly send it via email from within the sharing dialog The client can then access the document via the link and view it in their browser or download it as a PDF to their computers.
Conclusion
That's a wrap! With the steps from this guide, we have crafted a training document for our web agency client, created and applied our branded template to it, and shared it with the client. The client can now use the document to manage their WordPress website and refer to it whenever they need help - and we as an agency fulfilled our obligation to provide training materials to the client.
For subsequent projects, we can reuse our template and even clone existing documents to create new training documents for other clients quickly and efficiently.
As howt.io has a document manager with grouping features, we can also organize our documents by client or project to keep an overview of all training materials we have created.
If you are interested in more information, you can get an overview of the available features and plans on this page.